Showing posts with label Tips. Show all posts

Friday, January 20, 2012

Leave your musical status on Gtalk for Windows

Google Talk or gTalk chat application has a feature to show currently playing Music track on Windows Media player as you Status. On Windows Xp, it runs without problem.
 If GTalk doesn’t update status on change of Music track on Windows Media Player 12 in Window 7, there is some tricks you may need to apply.
 Actually there was no Google Talk Music Plugin for WMP 12 installed on Windows 7 system. So, Follow the steps given to start showing the name of song you are listening as Gtalk status.
 1. Uninstall Google Talk.
2. Visit http://www.google.com/talk/
3. Click Download Google Talk client near the bottom of the page.
4. Save the installation file to your desktop.
5. Right-click the installation file (googletalk-setup.exe) on your desktop and select Run as administrator.
6. Follow the instructions to install Talk
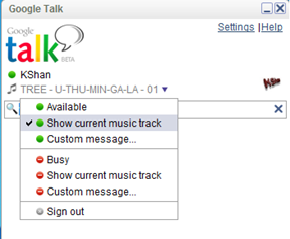
7. Run and Sign In to your gtalk and set as shown in figure
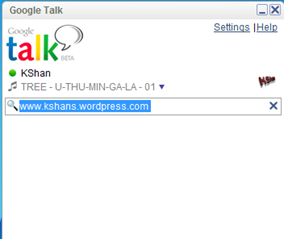
Still not working?
  • Run Windows Media Player.
  • Then go to Tools and then options.
  • Click on the Plug-ins tab and select Background category in it.
  • Now check the option of “Google Talk music plug-in” on the right side.
  • Then Apply and exit.

Add or Change GTalk Theme

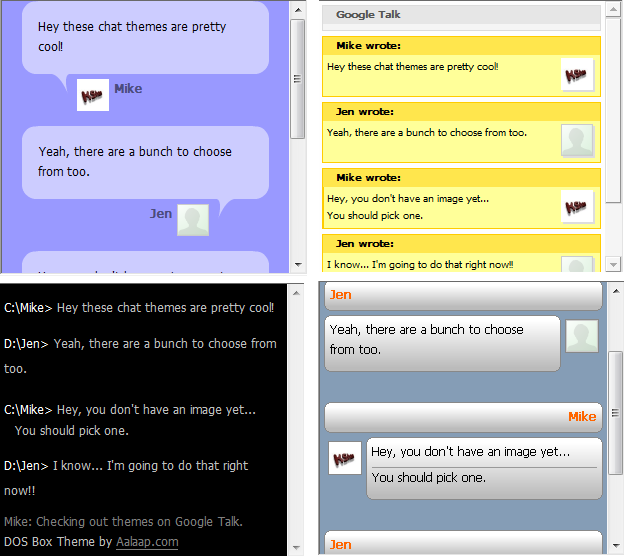
Most of the internet users prefer using Google talk as default chat client. Changing its appearance can enhance you chatting experience and it can be done using Gtalk themes. If you are bored with default look, mix some colors and change chatting styles and chat windows interface with cool, funny and fantastic Google Talk themes.
Now you can change appearance of Gtalk according to your choice and for that You can find a huge collection of Google talk Themes here for free download or Theme Pack Here
.
How to install Google Talk theme?
  • Download Theme Pack Here
  • Extract the files in this .ZIP file to your desktop ( for example, with WinRAR )
  • If there is an executable between the files you extracted, run it.
  • This will install the theme for you. You’re done.
  • If you can’t find an executable, you need to install the theme manually.
  • The theme is located in a folder you just extracted. Look for a folder with the same name as the theme.
  • Once you have found this folder, you need to move it to the directory where Google Talk stores all its themes.
For Windows XP – This is C:\Documents and Settings\USERNAME\Local Settings\Application Data\Google\Google Talk\themes\user\chat.
For Windows 7 – This is C:\Users\USERNAME\AppData\Local\Google\Google Talk\themes\system\chat
USERNAME needs to be replaced with your windows username. Move the entire theme folder to this location.
After following above steps, You need to apply Google talk theme.

How to change Google Talk Theme?
  • Start Google Talk if it’s not already running.
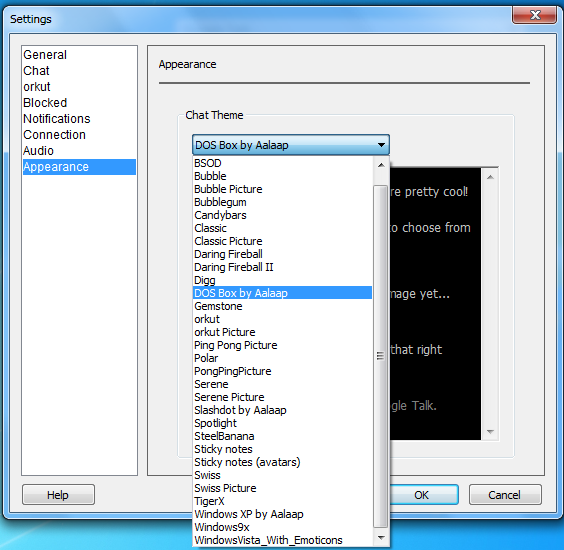
  • Now open your settings window by clicking ‘Settings’.
  • Select ‘Appearance’ from the left menu
  • Your theme should appear in the list, if not, you did something wrong.
  • Select the theme and click OK.

Log in with Multiple Account in Gtalk

If you have two or more gtalk account and having problem to login at the same time…
This is some trick to use multiple account in the same computer at the same time.
As shown in the following figure, u can log in to many gtalk users in the same computer.

To do so,

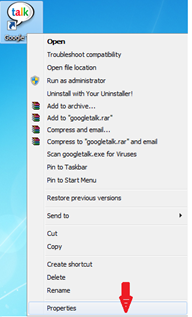
Right click on the gtalk shortcut and go to properties and

just append the text /nomutex in the Target box..
The text would be the following:
"C:\Program Files\Google\Google Talk\googletalk.exe" /startmenu /nomutex
See the following image.

Thursday, January 5, 2012

Error 553, SMTP Authorization


“553 sorry, that domain isn’t in my list of allowed rcpthosts; no valid cert for gatewaying”

There could be many things leading to the problem. One of them is client inability to authorize to SMTP server. Here’s a quick explanation of what happens and how the problem could be solved.

Several years ago when the Internet was young and all internet users were absolutely honest people the SMTP protocol (the one that works when you’re sending emails) was very simple and quite unprotected. Anyone was allowed to connect to any server, introduce themselves as anyone and send email to anyone in the world. When the Internet expanded beyond those few hundred scientists that used the net of the nets for their fair purposes spam was born. 
So people realized that they should somehow limit the scope of people allowed to send emails thru given mail server. That means anyone willing to send email using some mail server in the modern world has to authenticate. 

The 553 error message may mean that your mail client didn’t authorized itself correctly.

There are two basic ways of authentications and dozen of their modifications. The primary methods are
  • POP3 lock – the server assumes that anyone authenticated using POP3 is also allowed to send email
  • SMTP authorization requires your client to provide login and password before you’re able to send emails
So what you have to do is to enable one method or another on the mail server and configure your mail client. Here are some glitches you might be hit with:
  • If you’re using IMAP protocol to retrieve mail from the server you obviously can’t use POP3 lock. SMTP suthorization if your only choice.
  • If you enable both POP3 lock and SMTP auth in combination with IMAP mail retrieval macmail client will be able to send email only every other time. I have no good explanation for this

So SMTP authorization looks like you best choice. To configure it in MS Outlook
  • Go to Tools->E-mail Accounts
  • Select View or Change existing, Click Next
  • In the new window select the account you want to configure and click Change
  • In the new window click Change
  • In the new window select Outgoing Server tab
  • Check My outgoing server (STMP) requires authentication, provide login and password if necessary (typically use the same settings as your POP3 account)
  • Click Ok
  • Click Next
  • Click Finish

Saturday, December 17, 2011

Root Android Gingerbread 2.3.3 with SuperOneClick

The purpose of rooting the android device is to gain access system level as "root access". It is analogous to jailbreaking devices running the Apple iOS operating system or the Sony PlayStation.


1. Download SuperOneClick and extract from archive
2. From windows\system32  copy "cmd.exe" to adb folder in SuperOneClick
3. Open cmd.exe  and copy :
    adb devices
     adb shell
     echo 1 > /data/local/lge_adb.conf 

4. Open SuperOneClick program and click root


Note: Enable usb debugging mode : settings>applications>developer

Tuesday, December 13, 2011

Synchronize time throughout entire Windows network

Synchronizing time on Windows domain requires following the Active Directory domain hierarchy to find a reliable time source for entire domain. In a Windows Server 2003 Active Directory forest, the server that holds the primary domain controller (PDC) emulator role acts as the default time source foryour entire network.
Each workstation and server in this network will try to locate a time source for synchronization. Using an internal algorithm designedto reduce network traffic, systems will make up to six attempts to find a timesource.
The order of these attempts are:
  • Parent domain controller (on-site)
  • Local domain controller (on-site)
  • Local PDC emulator (on-site)
  • Parent domain controller (off-site)
  • Local domain controller (off-site)
  • Local PDC emulator (off-site)
To ensure that servers are finding the proper time, configure PDC emulator to receive the time from a valid and accuratetime source. To configure this role, follow these steps:
  1. Log on to the domain controller.
  2. Enter the following at the command line:
W32tm /config /manualpeerlist:<timeserver> /syncfromflags:manual
 
<timeserver>is a space-delimited list of DNS and/or IP addresses. When specifying multiple timeservers, enclose the list in quotation marks.
  1. Update the Windows Time Service configuration. At the command line, enter either
    w32tm/config/update or 
     Net stop w32timeNet start w32time
 
If a system isn't a member of a domain, manually configure it to synchronize with a specified time source. Follow these steps:
  1. Go to Start | Control Panel, and double-click Date And Time.
  2. On the Internet Time tab, select a time server from the drop-down list, or enter the DNS name of your network's internal time source.
  3. Click Update Now, click Apply, and click OK.
Note: It's important to make sure that any access control lists on network allow UDP port 123 to and from systems to the selected time source. For more information, see Microsoft's Windows Time Service Tools and Settings documentation.

Saturday, December 10, 2011

Enable / Disable Legal Notice Dialog Box Before Logon

Today, I was helping my brother computer which was having "Legal Notice Dialog Box " before he can log on to his window 7. It was very annoying message displaying on the screen and there was only a OK button to proceed to log on window..
I did a research on the net and found out a registry tips and solved the problem.
The solution was:

Disable Legal Notice Dialog Box Before Logon
  • Start -> Run -> Regedit
  • HKEY_LOCAL_MACHINE\SOFTWARE\Microsoft\Windows NT\CurrentVersion\Winlogon
  •  delete two registery entry "LegalNoticeCaption" and "LegalNoticeText"
  • Exit Registry Editor and Restart Computer


It's also useful when you are required by law to warn warn people that it is illegal to attempt to logon without being an authorized user. To do so, create a dialog box that will be presented to any user before logging onto the system.

Enable Legal Notice Dialog Box Before Logon

->  HKEY_LOCAL_MACHINE\SOFTWARE\Microsoft\Windows NT\CurrentVersion\Winlogon

->  Modify the value named ‘LegalNoticeCaption’ to represent the caption on the dialog box
     (e.g. ‘WARNING!’). If this value doesn’t already exist create it. 

->  Modify the value named ‘LegalNoticeText’ to represent the body of the dialog box
     (e.g. ‘Do Not Attempt to Logon to this system unless you are an authorized user!’) 

->  Exit registry editor and restart Windows, 
->  and the next time you boot up you should be presented with the dialog box before   logging on.

Registry Settings
Value Name: LegalNoticeCaption, LegalNoticeText
Data Type   : REG_SZ (String Value)

Make GTalk always Idle

1: Download a program Here to make your gtalk always idle

2: Install it.
    For window 7 install with window xp compatibility mode and administrator mode

3: Open gtalk and right click on gtalk which is running on the system tray and choose   always Idle


Download Gtalk Always Idle  Link 1
Download Gtalk Always Idle  Link 2